


Vendor onboarding is where procurement, finance, legal, security, and operations either start aligned or inherit months of avoidable friction.
A vendor onboarding checklist is the operating workflow that turns an approved supplier, agency, contractor company, service provider, or platform partner into a vendor your team can safely work with, pay, review, and renew.
Without a consistent process, setup spreads across email threads, spreadsheets, finance tickets, legal comments, security questionnaires, and manager memory. The vendor may be approved, but work still stalls because banking details are missing, the contract is unsigned, access is unclear, or nobody owns first invoice approval.
What’s in this article?
- What vendor onboarding should include after selection or approval.
- A checklist for documents, risk, payment setup, access, and launch readiness.
- A workflow across procurement, finance, legal, IT, and operations.
- Common failure points that delay work or create compliance exposure.
- Where Workhint fits when onboarding needs to become repeatable.
Why vendor onboarding matters
Vendor onboarding is the bridge between choosing a vendor and working with them. Approval decides whether a vendor should be used. Onboarding makes sure the vendor can start with the right documents, terms, risk checks, contacts, access, and payment path in place.
That distinction matters because vendor risk usually appears in operational gaps. A vendor might have a signed agreement but no verified payment information. A team might collect a security questionnaire but forget to limit access. A manager might start work before finance setup.
For U.S. vendors, tax setup often includes collecting taxpayer identification details through IRS Form W-9. For vendors that create sanctions, geography, ownership, or payment risk, businesses may also use the OFAC Sanctions List Search as part of due diligence. These checks do not replace legal advice, but they help teams avoid late compliance work.
Vendor onboarding checklist
The exact checklist depends on vendor type, country, spend level, data access, and work performed. A low-risk office supplier does not need the same review as a vendor handling customer data, payment flows, field operations, or regulated work.
- Confirm the vendor request. Capture who requested the vendor, what work is needed, expected start date, budget, renewal expectations, and the internal owner.
- Assign a risk tier. Classify the vendor by spend, data access, business criticality, location, regulatory exposure, and whether the vendor will interact with customers, contractors, employees, or financial systems.
- Collect legal and business details. Request legal entity name, address, tax details, certificates, insurance, licenses, ownership information when relevant, and primary contacts.
- Complete tax and payment setup. Collect W-9 or applicable tax forms, banking or payment method details, currency, invoice requirements, payment terms, and remittance contacts.
- Route contract and compliance approvals. Confirm the agreement, statement of work, data processing terms, confidentiality terms, insurance requirements, and any country- or industry-specific review.
- Run security and access review. Decide whether the vendor needs systems, data, locations, devices, shared folders, portals, or customer information. Grant only required access.
- Prepare kickoff materials. Share scope, deliverables, communication norms, escalation contacts, review cadence, invoice process, and acceptance criteria.
- Confirm launch readiness. Make sure documents, approvals, access, payment setup, and owner assignments are complete before work begins.
- Set ongoing review triggers. Schedule renewal reminders, document expiration checks, access reviews, performance check-ins, and offboarding.
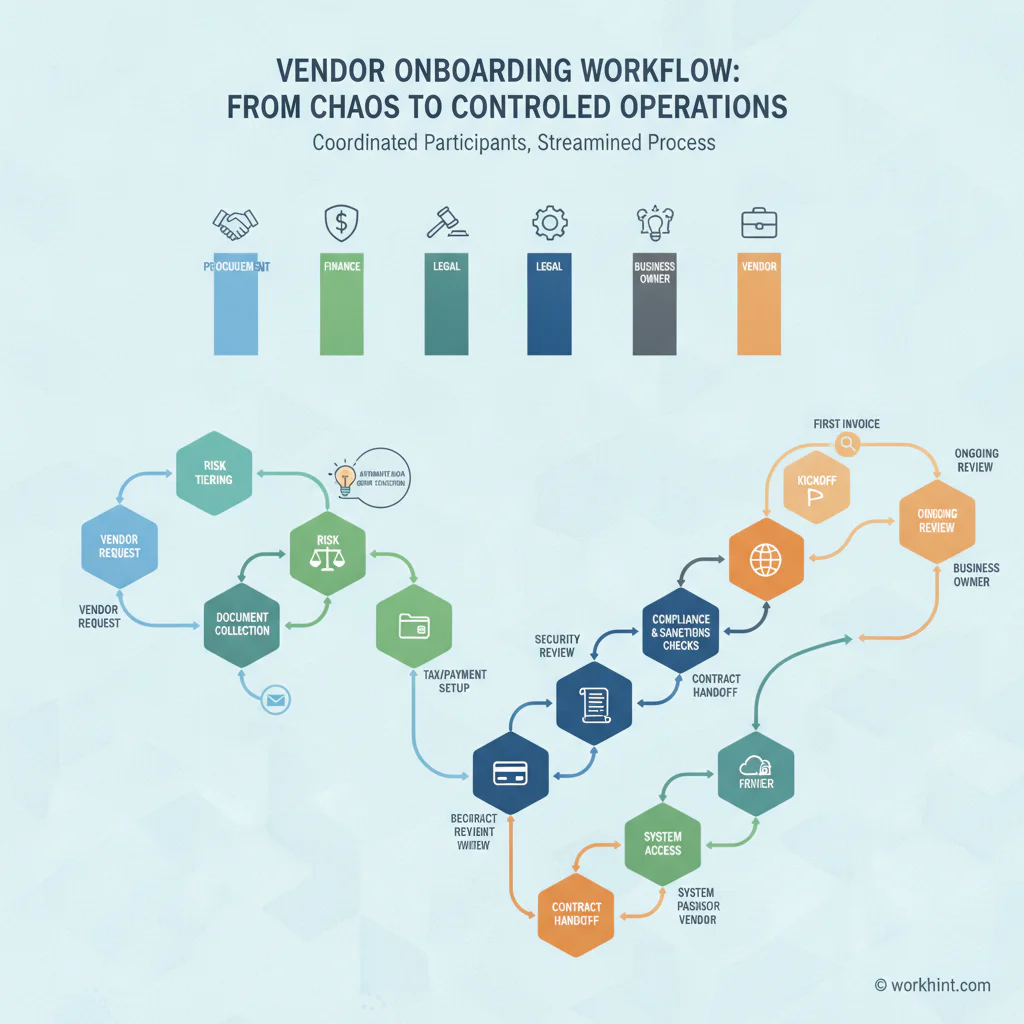
Vendor onboarding workflow
A useful workflow gives each team a clear role. The business owner should not chase every document, and finance should not discover missing legal or security work at invoice time.
| Step | Primary owner | Output |
|---|---|---|
| Vendor request | Business owner | Need, budget, timeline, and internal sponsor |
| Risk tiering | Procurement or operations | Low, medium, or high-risk onboarding path |
| Legal review | Legal or business approver | Agreement, SOW, confidentiality, and liability terms |
| Finance setup | Finance or AP | Tax form, payment method, terms, and vendor master record |
| Security review | IT or security | Access scope, data handling review, and tool provisioning |
| Operational launch | Business owner | Kickoff, communication cadence, first deliverable, and invoice path |
For vendors with cybersecurity or data access risk, use a stronger review than a generic checklist. The NIST Cybersecurity Supply Chain Risk Management program is a useful reference for supplier risk as an ongoing discipline. Covered financial institutions and similar regulated businesses should understand service-provider oversight obligations under the FTC Safeguards Rule.
Risk-tiered vendor onboarding
The fastest vendor onboarding process is not the shortest checklist. It is the checklist that asks for the right evidence based on the vendor’s risk.
Low-risk vendors may only need business details, tax form, payment setup, basic agreement terms, and a named internal owner.
Medium-risk vendors usually need contract review, insurance confirmation, invoice controls, limited access provisioning, and a defined renewal or review cadence.
High-risk vendors need deeper due diligence. That may include security questionnaires, data processing terms, legal review, sanctions or ownership checks, proof of insurance, business continuity questions, system access review, and executive or compliance approval.
Common vendor onboarding mistakes
The first mistake is treating approval as onboarding. Approval answers “should we use this vendor?” Onboarding answers “can this vendor start safely, get paid correctly, and be managed consistently?”
The second mistake is letting every department run its own side process. If procurement, legal, IT, finance, and the manager are not connected, nobody sees the full readiness picture.
The third mistake is overloading every vendor with the same checklist. Risk tiering keeps the process fast without making it casual.
The fourth mistake is forgetting the first invoice. Onboarding is not complete until finance knows how invoices should be submitted, who approves them, what evidence is required, and when payment is due.
Where Workhint fits
Workhint fits when vendor onboarding needs to become a live operating workflow instead of a shared checklist. A team can use Workhint to define the request, route approvals by risk tier, collect documents, assign owners, manage access tasks, track payment setup, schedule reminders, and give vendors or internal teams a clear workspace for the next step.
That is especially useful for companies working with many agencies, suppliers, service providers, contractors, staffing partners, field vendors, or external operators. The value is connecting intake, documents, roles, approvals, launch steps, payment readiness, and ongoing review so work can start without losing control.
FAQ
What is vendor onboarding?
Vendor onboarding is the process of setting up a vendor so the business can work with them safely and efficiently. It usually includes business details, tax forms, contracts, payment information, compliance documents, access requirements, and launch instructions.
What should be included in a vendor onboarding checklist?
A vendor onboarding checklist should include request details, risk tiering, legal entity information, tax forms, payment setup, contract approvals, insurance or compliance documents, security review, access provisioning, kickoff details, invoice instructions, and review reminders.
Who owns vendor onboarding?
Ownership is usually shared. Procurement or operations may own the workflow, finance owns payment setup, legal owns contract review, IT or security owns access and data risk, and the business owner owns scope and delivery expectations.
How long should vendor onboarding take?
Low-risk vendors can often be onboarded in a few days if required information is ready. Higher-risk vendors may take longer because legal, security, compliance, insurance, or executive approvals are needed.
How can vendor onboarding be automated?
Automation can route intake forms, assign approval tasks, request missing documents, trigger risk-based checklists, remind owners about expiring documents, and connect payment setup to launch readiness. Human review should remain for legal, compliance, security, and high-risk decisions.
Conclusion
A vendor onboarding checklist works best when it is tied to ownership, risk, and launch readiness. The point is to make sure each vendor has the right approvals, records, access, payment setup, and operating expectations before work begins.
When vendor onboarding becomes a coordinated workflow, teams move faster without relying on informal handoffs. Vendors know what to provide. Internal teams know what to approve. Finance knows how payment will work. Operations knows when the vendor is ready to start.
Leave a Reply